
fillingstation.com works though!

You are using an out of date browser. It may not display this or other websites correctly.
You should upgrade or use an alternative browser.
You should upgrade or use an alternative browser.
1976 Superior 54XL Restoration Log
- Thread starter Jean-Marc Dugas
- Start date
Jean-Marc Dugas
PCS Member
Today's progress...
glad i got it before the died.
If you lay the origional matt out in the sun up sids down you can use a good quality duck tape and bring the tears togather working the edges flat tape it on the top side. Thene use the 3 M product for repairing the rubber bumper covers you can repair that matt. They started out with a white and black mix but the last time i got it it was black and black. So you will end up with a black line. But at least it's not torn. Reinforce it on the back side when you do with a piece of nylon screen and it will be stronger then new. If you have edges that don't want to lay flat a hair dryer will warm it up and a weight will flatten it while it cools. It will work on most rubber vinyl or plastic parts.
Bill Leverett
PCS Member/Super Site Supporter/Paramedic Supervis
Ed...Is that the one listed for a 1947-55 Chev truck? Part number FS-13A $120.70 ?Bill i used one from thefillingstation.com for my 53 it labled for a chevy but worked out will.
Us the sedan delivery one. At least they listed one when i was looking.
Jean-Marc Dugas
PCS Member
The cab area flooring is on hold until I get the new headliner installed.
I removed the cabinets, squad bench, etc from the car and only left the driver's seat so that the folks at the upholstery shop have as much space as possible to do the job.

I also installed closed foam sound deadener to the ceiling to dampen the noise in the car. Hopefully with the sound deadener in the cab and the patient area the ride will be much quieter.
I should get the car back early next week. While I am waiting it will be a good time to start working on replacing the old Formica on the wooden surfaces. The plan is that none of the cabinets, etc will go back in the car until they are refinished. This is mainely so that I do not tear the new headliner.
I removed the cabinets, squad bench, etc from the car and only left the driver's seat so that the folks at the upholstery shop have as much space as possible to do the job.
I also installed closed foam sound deadener to the ceiling to dampen the noise in the car. Hopefully with the sound deadener in the cab and the patient area the ride will be much quieter.
I should get the car back early next week. While I am waiting it will be a good time to start working on replacing the old Formica on the wooden surfaces. The plan is that none of the cabinets, etc will go back in the car until they are refinished. This is mainely so that I do not tear the new headliner.
Headliner is always the first thing in place.
Jean-Marc Dugas
PCS Member
While I am waiting to get the car back it is the perfect opportunity to get back to removing the laminate from the interior components. Using a heat gun and a scraper does a good job removing the laminate from the plywood. Definitively need to do that in a well ventilated area, i.e. outside. I am sure that 48 year old glue does not off-gas really healthy VOCs when heated!
I am trying to keep the laminate as intact as possible so that can use the different parts I remove as a reminder of the direction of the grain and as templates for when I cut the new ones.


Next step is applying the adhesive remover. Since the Roberts 5505 I was using last year is now discontinued I had to test a few different products and settled with the Max Strip Floor Adhesive Stripper. Not as good as the 5505, but works relatively well..


I am trying to keep the laminate as intact as possible so that can use the different parts I remove as a reminder of the direction of the grain and as templates for when I cut the new ones.
Next step is applying the adhesive remover. Since the Roberts 5505 I was using last year is now discontinued I had to test a few different products and settled with the Max Strip Floor Adhesive Stripper. Not as good as the 5505, but works relatively well..
They keep taking away thing that work don't they. Now me i got to mark things with a up arrow and location our I forget how they went.
Jean-Marc Dugas
PCS Member


Jean-Marc Dugas
PCS Member
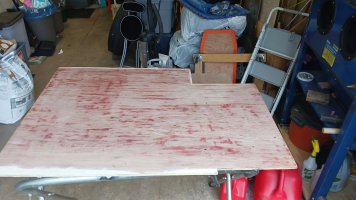
Work continues to remove the laminate from the interior components. It is a slow process to use a hot gun and a scraper to try to lift the laminate from the wood without damaging either.
Today I removed the laminate from the shelving unit as well as the top of the squad bench. Hopefully the weather will be nice tomorrow so I can finish removing the laminate from the squad bench and proceed to remove the glue. I will also have to paint the inside of the cabinets.

Is some water damage to the lower rear corner as well as some delaminated plywood on the horizontal section at the back of the cabinets. To fix this last part, I can just glue back the piece that came off, however I may have to cut out a piece of plywood and replace it with a new one where the water damage is.

Today I removed the laminate from the shelving unit as well as the top of the squad bench. Hopefully the weather will be nice tomorrow so I can finish removing the laminate from the squad bench and proceed to remove the glue. I will also have to paint the inside of the cabinets.
Is some water damage to the lower rear corner as well as some delaminated plywood on the horizontal section at the back of the cabinets. To fix this last part, I can just glue back the piece that came off, however I may have to cut out a piece of plywood and replace it with a new one where the water damage is.
Jean-Marc Dugas
PCS Member
I unrolled the role of laminates in the basement so I can overlay the laminates I removed from the interior components to figure out how I will cut each individual piece.
The layout has changed once or twice since I took this picture. This is quite the puzzle trying to place each piece in the location that will maximize the space. Also very important is to match the wood grain Direction of the original components.
I hope that I will have enough of two sheets of laminate to do the job.
Jean-Marc Dugas
PCS Member
The squad bench has quite a be of delamination going on and water damage. I am thinking it may take as much time rebuilding it as it will take fixing it and removing all of the old glue and preping it for the new laminate.


Slow going work one piece at a time. But worth the effort.
Jean-Marc Dugas
PCS Member
This part of the process is really slow, but I hope that this prep work will make all the difference when I put everything back together.Slow going work one piece at a time. But worth the effort.
Besides the van guys, there is not many car restoration that required carpentry skills!
Luckily, I know a cabinet maker who is reproducing (and then laminating) my severely rotted cabinets for my '78 Superior.This part of the process is really slow, but I hope that this prep work will make all the difference when I put everything back together.
Besides the van guys, there is not many car restoration that required carpentry skills!


Jean-Marc Dugas
PCS Member
Nice!Luckily, I know a cabinet maker who is reproducing (and then laminating) my severely rotted cabinets for my '78 Superior.
Jean-Marc Dugas
PCS Member
Replaced the bottom part of the Cabinet unit. Just got to finish filling that section where the plywood delaminated and it will be ready for the next step.
